
Last updated: November 2026 · 12 min read
A tech pack is the document that tells a garment factory exactly what to build. If you have ever sent a supplier a logo file and a quantity and hoped for the best, you have already run a tech pack without one — and the factory filled in every blank itself, which is exactly how colour codes end up wrong, print placements end up too large, and the sample you approve is not the shirt you receive.
For buyers ordering custom apparel from an OEM manufacturer, the tech pack is the single highest-leverage document in the whole process. It converts a vague idea into a specification a factory can quote, sample against, and mass-produce without guessing. This guide covers what a tech pack for custom t-shirts actually contains, field by field, and how to fill it in so quotes come back fast and the sample matches the bulk order.
What Is a Tech Pack for Custom T-Shirts?
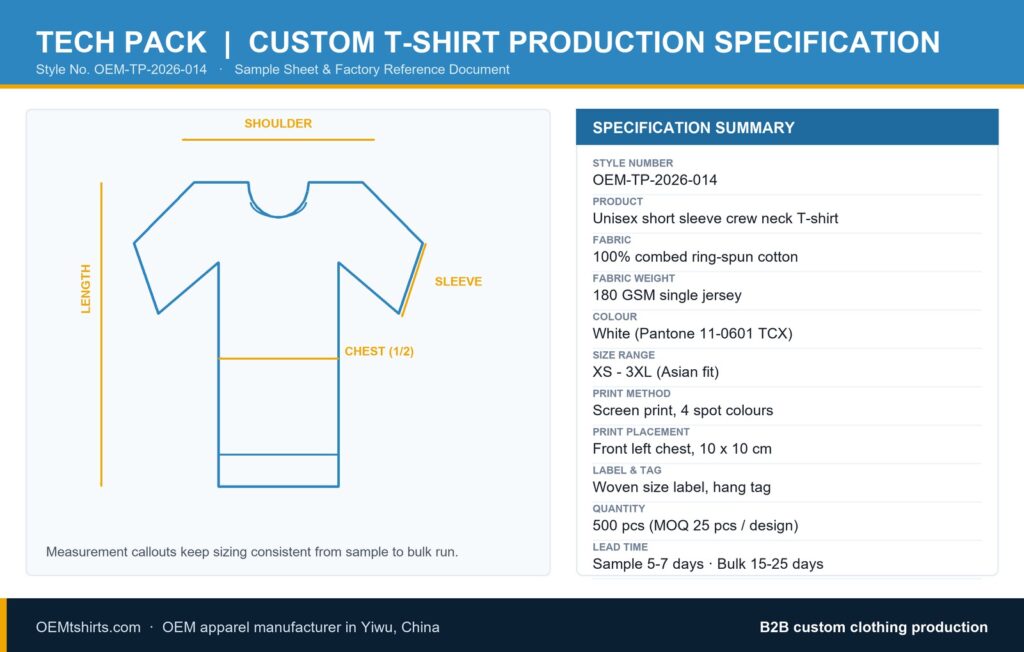
In plain terms, a tech pack is a production specification document. It is not artwork, it is not a mood board, and it is not a catalogue photo. It is a written record of the garment’s construction: what it is made of, how it is sized, where the print goes, how big the print is, how it is labelled and how it is packed.
For a single style and colour, a usable tech pack is usually two to four pages. For a range with multiple colourways and sizes, it becomes a spreadsheet with one row per style plus one technical drawing per placement.
Tech Pack vs. Size Chart vs. Artwork File
These four documents get confused constantly, and confusing them is the reason so many first-time bulk orders go wrong. They are not substitutes — they each cover different ground.
| Document | What it specifies | Who supplies it | Common mistake |
|---|---|---|---|
| Tech pack | Construction, materials, print, sizing, packaging for a style | Brand / buyer | Treating it as an optional extra rather than the order itself |
| Size chart | Finished garment measurements per size | Brand (often copied from a supplier) | Using a generic chart that does not match the chosen fabric |
| Artwork file | Print artwork in vector or high-resolution raster | Designer / brand | Sending a low-resolution JPG instead of a vector file |
| Sample | A physical garment built from the tech pack | Factory | Approving the sample and then changing the spec |
The important relationship: the artwork file gets placed into the print area that the tech pack defines, and the size chart governs the dimensions that the tech pack references. If your tech pack does not specify a print area size in centimetres, the factory will use the artwork file’s own dimensions and your logo will come out at whatever size the illustrator exported it.
Our guide on how to prepare artwork for t-shirt printing covers the file side in detail, and the custom t-shirt size chart guide covers the measurement side.
The 6 Blocks Your Tech Pack Needs
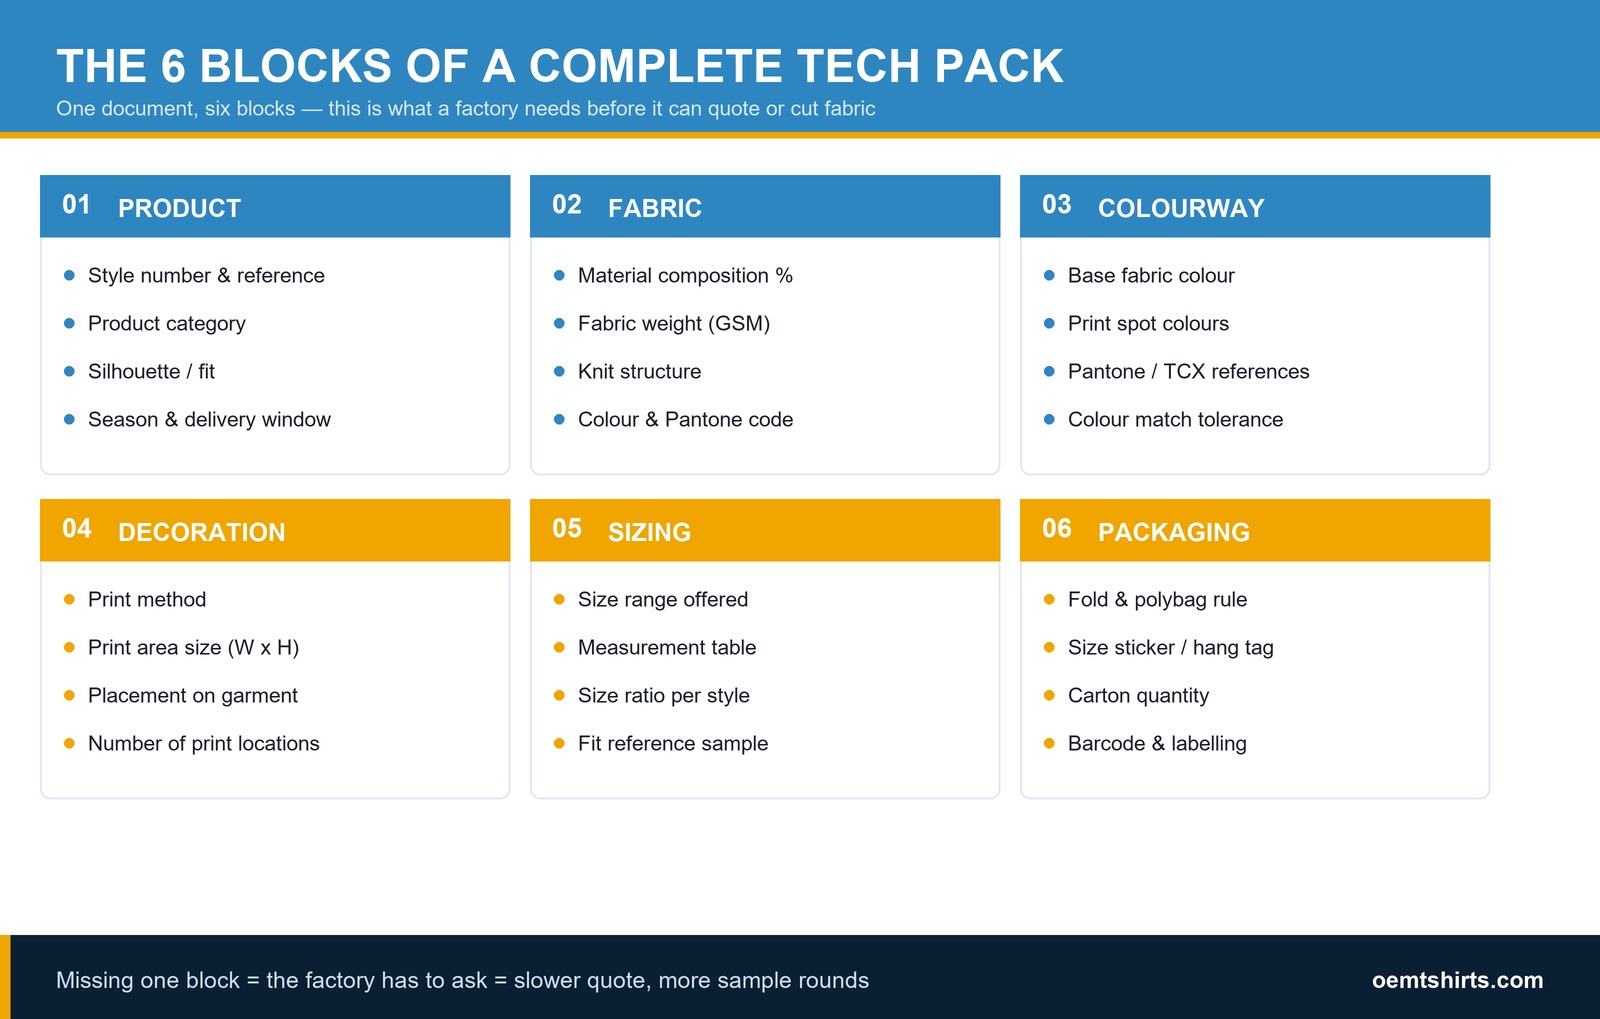
A complete tech pack for custom t-shirts is organised into six blocks. Brands often start with the print block because that is the part they care about, then discover at sample stage that the fabric weight was never specified. Work through the blocks in order and the document writes itself.
Block 1 — Product
The product block answers “what are we making?” It carries the style number that every other document will reference, the garment category, the fit and the delivery window. The style number matters more than it looks: it is the key that ties the tech pack, the sample, the inspection report and the invoice together. Give every style its own number and never reuse one, even for a colour swap.
Block 2 — Fabric
The fabric block states composition, weight and construction. This is where most “cotton t-shirt” orders go wrong, because “cotton” on its own describes dozens of different garments. Specify composition percentage, GSM weight and knit structure together. Our article on what GSM means in t-shirts explains why weight changes the fit, the price and even which print method is possible.
Block 3 — Colourway
The colourway block defines the base fabric colour and every print colour, each with a Pantone or TCX reference. It also states the tolerance the factory must hit when matching fabric to a physical swatch or to a previously approved bulk fabric.
Block 4 — Decoration
The decoration block covers print method, artwork, placement, print area size and quantity of placements. This is the block buyers underestimate most, because “logo on the chest” is not a specification.
Block 5 — Sizing
The sizing block lists the size range offered, the measurement table for each size, the size ratio for the run and the fit reference. It also states whether measurements are taken pre-shrink or post-wash.
Block 6 — Packaging
The packaging block covers folding method, polybag rules, size stickers, hang tags, carton quantities and barcodes. It is the block most often skipped and the one that causes the most expensive problems at the shipping stage, when goods arrive packed in a way that damages the print or the labels.
Block 1 in Detail: Product Specification Fields
Every field in the product block should be filled in explicitly, even where the answer seems obvious. A blank field is an invitation for the factory to make a decision on your behalf.
| Field | Example | Why it matters |
|---|---|---|
| Style number | OEM-TP-2026-014 | Links tech pack, sample, inspection and invoice to one style |
| Product name | Unisex short sleeve crew neck T-shirt | Prevents category confusion at the cutting stage |
| Fit / silhouette | Regular fit, Asian fit block | Fit block changes every measurement on the chart |
| Neckline | Crew neck, 1×1 rib, 2 cm | Collar construction is a separate cost and time item |
| Sleeve | Short sleeve, set-in sleeve | Raglan and set-in sleeves are cut from different patterns |
| Season / delivery | SS27, delivery by 2027-03-15 | Sets the production window and fabric booking deadline |
| Order quantity | 500 pcs | Determines which price break applies |
| Cost target | USD 6.80 FOB Yiwu | Gives the factory a design target to quote against |
Our guide to MOQ for t-shirt manufacturers explains how quantity changes the economics, and why the MOQ is per design rather than per order.
Block 2 in Detail: Fabric and Colour Specifications
Fabric and colour are where a tech pack earns its keep. Two orders with identical artwork and quantities can differ by more than a dollar per piece purely because of what the fabric block says.
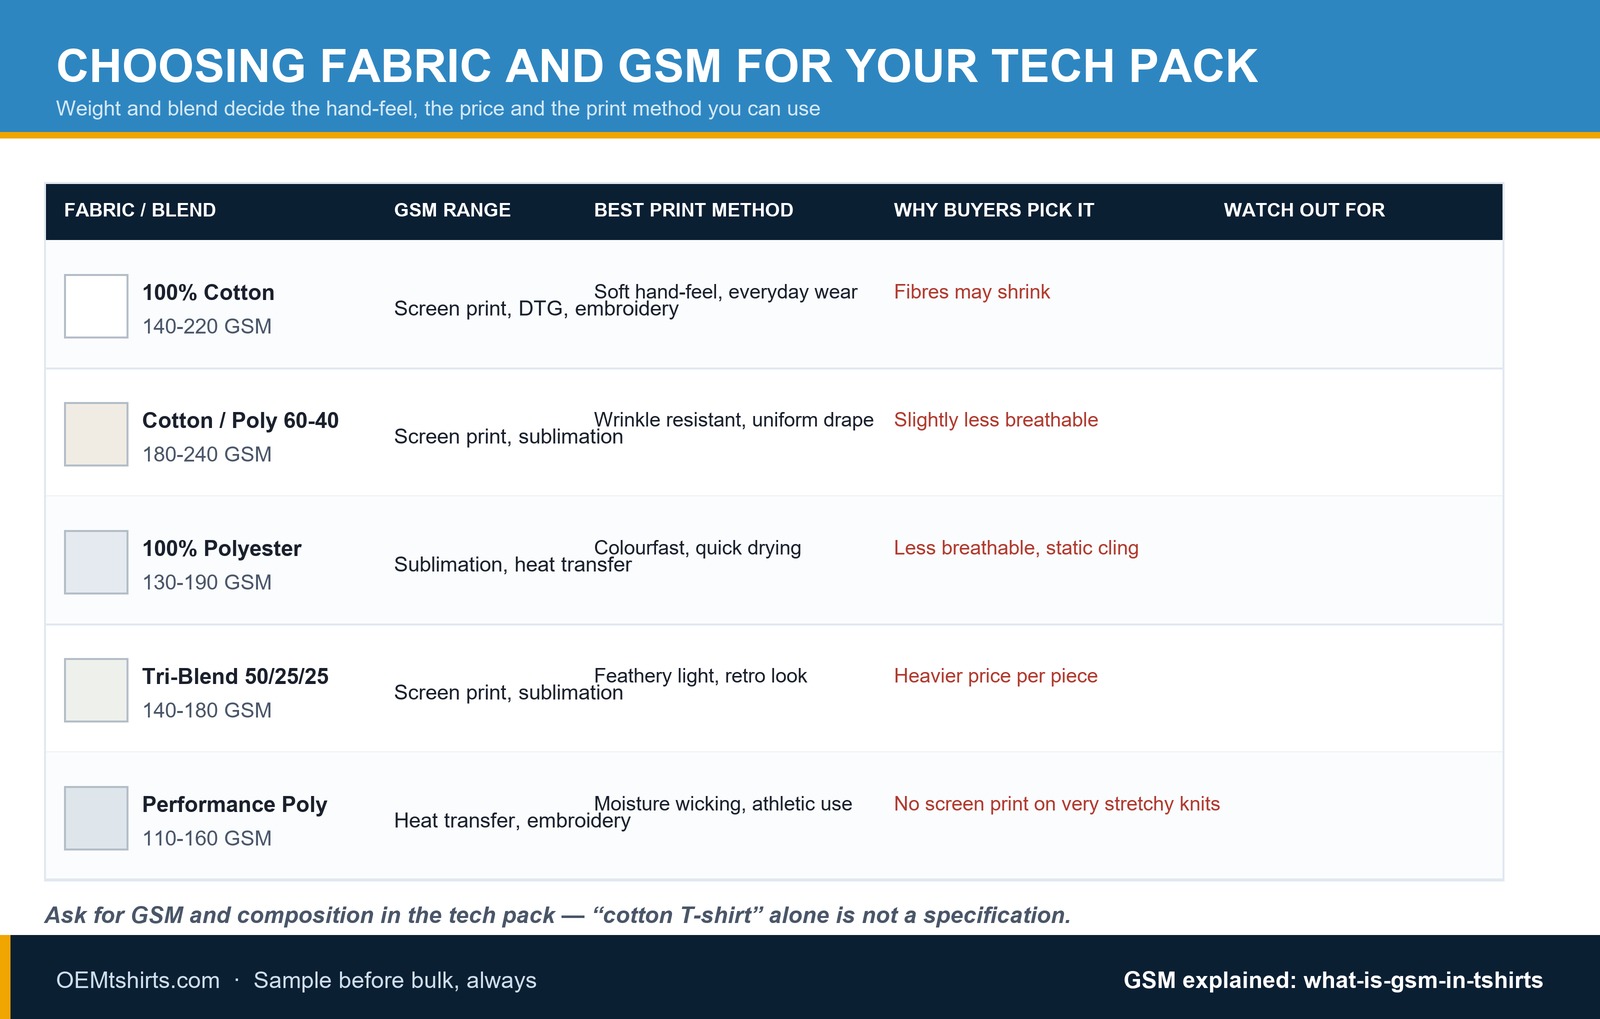
Write the fabric block like this: “100% combed ring-spun cotton, single jersey, 180 GSM, 24s yarn count, enzyme-washed, white body (Pantone 11-0601 TCX), shade tolerance ±2”. Every one of those terms removes a decision from the factory.
Two details get skipped more than any others. First, the yarn count and knit structure: “180 GSM” could be a fine 40s single jersey that feels like a dress shirt or a heavy 24s jersey that feels like a sweatshirt, both at the same stated weight. Second, the shrinkage allowance. Cotton shrinks 3–5% untreated, so if the measurement table is written pre-shrink and the bulk order is graded post-shrink, the finished garment does not match the approved sample. State which one your numbers refer to.
For colour, always give a Pantone or TCX code and a physical reference where possible. Digital Pantone values shift slightly between dye lots, and factories that order fabric from different mills will get visibly different whites. If you are ordering a repeat of a previous run, send the actual bulk fabric as the standard to match against — that is more reliable than any code.
Block 4 in Detail: Print Placement and Size
Print placement is specified with two numbers and a position: the area size in centimetres, and where that area sits on the garment. Anything less gives the factory freedom to resize.
| Field | Example | Notes |
|---|---|---|
| Print method | Screen print, 4 spot colours | Plastisol vs water-based vs DTG changes cost and handle |
| Placement | Front left chest | Left as worn by the wearer, i.e. viewer’s right |
| Print area size | 10 x 10 cm (W x H) | Always state the finished artwork size, not the file size |
| Print position | 8 cm from shoulder seam, 10 cm from centre front | Distance based, not a screenshot |
| Base colour under print | Garment colour (no underbase) | Dark garments usually need an underbase for light inks |
| Print quantity | 1 front, 1 back | State per placement |
| Finishing | Heat cure, 160°C, 90 sec | Cure settings affect colour fastness |
Always specify position as a distance from a seam, not as a visual reference. “Logo 8 cm down from the shoulder seam and 10 cm from the centre front” produces the same placement on every garment in the run; a screenshot of a mockup does not. If you need the best printing method for custom t-shirts, our comparison covers screen print, DTG, DTF and embroidery against cost, durability and order size.
One more point on print size: artwork is usually designed larger than the final print so it can be scaled down cleanly. State the finished print dimensions in the tech pack and separately confirm your artwork file matches that aspect ratio, or the factory will crop to fit. Our article on preparing artwork for printing covers resolution, vector formats and bleed.
Block 5 in Detail: Sizing and Measurement
The sizing block carries the size range, the measurement table, the size ratio and the fit reference. The measurement table is the part buyers most often copy from a supplier website without checking that it belongs to the chosen fabric and fit block.
At minimum include: chest width (1/2 chest, flat), body length (HPS to hem), sleeve length (from shoulder seam), shoulder width and neck width, each with the measurement method stated. Our custom t-shirt size chart guide has the standard unisex tables and explains how to measure a garment correctly.
The size ratio is the quantity per size across the run. A 500-piece order is rarely 500 of one size. State the split explicitly — for example S 60 / M 180 / L 150 / XL 80 / 2XL 30 — so the factory cuts to the right plan and you receive a balanced run. If you are unsure, ask the factory to propose a ratio based on your market; it is a routine request and takes minutes.
Our 180 GSM cotton regular short sleeve fit is a good reference block if you are starting from a common everyday weight.
Block 6 in Detail: Packaging and Labelling
Packaging is where the last 5% of the cost and most of the shipping damage happens. Specify all of it:
- Folding method — single fold, half fold, or flat packed. Folding affects both carton volume and whether the print creases.
- Polybag — material, thickness, recycling marking, and whether a size sticker is inside or outside.
- Size sticker — printed or adhesive, and whether it must be tear-resistant or washable.
- Hang tag — material, hole position, string type. Provide the artwork file if a printed tag is required.
- Carton — pcs per carton, carton dimensions, carton markings, and gross weight.
- Barcode / labelling — EAN, UPC or internal SKU, applied at the factory or on arrival.
For anything shipping internationally, state whether you need carton markings and barcodes to comply with the destination retailer’s requirements. If your run is for a corporate or company shirt programme, add the labelling sequence here so size stickers land in the right place relative to the neck label.
How to Write a Tech Pack That Gets Quoted Fast
A complete tech pack shortens the quote cycle more than any other single thing you can do, because it eliminates the clarification emails. Here is the sequence that works.
| Stage | What happens | Typical time |
|---|---|---|
| 1. Tech pack sent | Factory reads the spec and flags anything unclear | Same day |
| 2. Clarification | Only genuine gaps come back — one round, not five | 1–2 days |
| 3. Quote issued | Unit price broken down by fabric, decoration and packaging | 2–3 days |
| 4. Sample made | One blank plus your decoration, shipped to you | 5–7 working days |
| 5. Sample approved | You sign off fit, print and colour in writing | Your timeline |
| 6. Bulk production | Cutting, sewing, printing, finishing, QC | 15–25 working days |
| 7. Inspection | Inline and final inspection against the approved sample | 1–2 days |
| 8. Shipped | Cartoned per your packaging block | 3–7 days by sea or air |
Our article on how t-shirt manufacturing actually works goes deeper into each stage, and the complete step-by-step ordering guide covers the process from first enquiry to delivery.
Common Tech Pack Mistakes That Delay Production
These are the issues we see most often, and every one of them is avoidable at document stage.
1. Leaving the fabric block vague
“100% cotton tee” produces a quote for the cheapest thing that matches, which is rarely what the buyer pictured. Specify composition, GSM and knit structure together.
2. Sizing from a generic chart
A chart copied from a competitor’s website belongs to a different fit block and often a different fabric weight. Ask the factory for their own chart, then compare. Our size chart guide explains what to check when you compare charts.
3. No print area size
If the tech pack does not state the finished print size in centimetres, the print comes out at the artwork file’s natural size. Always specify width x height.
4. Print position given as a picture
Reference distances from seams, not mockups. A mockup shows one garment; a seam distance reproduces on all of them.
5. Missing the size ratio
The factory either guesses or cuts one size and sells you the imbalance later. State the split.
6. Colour given by name only
“White” exists as at least a dozen slightly different whites. Give a Pantone or TCX code plus a physical swatch where you can.
7. No shrinkage basis
State whether the measurement table is pre-shrink or post-wash. This is the single most common cause of a bulk run not matching the approved sample.
8. Packaging left open
If folding and polybag are unspecified, the factory uses a default that may crease the print. Specify it, even if it is simply “single fold, plain polybag, no sticker”.
How OEMtshirts Reviews Your Tech Pack
As an OEM apparel manufacturer running production in Yiwu, China with an overseas warehouse for fast replenishment, we treat the tech pack as the contract for the garment. Here is what happens on our side once it arrives.
Our production team reads the spec against the six blocks and marks anything that is ambiguous, contradictory or missing. In a complete pack this is a short list. We then check fabric availability against the specified GSM and blend, confirm the decoration method suits the material, and quote line by line so you can see where the money goes. During production every piece is checked against the approved sample, not just against the tech pack, because a tech pack describes the intention while the sample shows the reality. Our quality control and inspection checklist details exactly what gets verified before anything leaves the factory.
You do not need to be an apparel professional to write a good tech pack. The structure above is the whole job. You can also browse our blank t-shirt range to pick a base garment first, then document it — starting from a real product removes most of the guesswork.
Tech Pack FAQ
How many pages should a tech pack be?
Two to four pages for a single style with one or two print placements. Add one technical drawing per placement and one measurement table for the size run. Multiple styles or colourways belong in a spreadsheet with one row per style.
Do I need a tech pack if I am only ordering 25 pieces?
You need the information, just not a formal document. At small quantities, a message with fabric, colour, size, print method and print size is enough. The pack becomes necessary once there are multiple colours, multiple sizes, custom trims or a repeat order that must match the first run exactly.
Can I send a tech pack in PDF or Excel?
Both work. PDF is best for a single style with drawings, Excel is better for a size run or a multi-style programme. Make sure print areas and measurements are stated in numbers and units, not only in a drawing.
Who should own the tech pack?
Your side, always. The factory can help you build it, and will usually give you a template, but the specification is your requirement and your approval covers it. Our contact page is the fastest way to start one with us.
What changes after the sample is approved?
Ideally nothing. The tech pack plus the approved sample together are the reference for the bulk run. If something does need to change after approval, update the tech pack document and have the change confirmed in writing before production continues — an unrecorded change is exactly how bulk orders diverge from the sample. See our cotton t-shirt range for typical finished specs.
Send Us Your Tech Pack
A complete tech pack is the fastest route to an accurate quote and a bulk order that matches your sample. If you have a spec ready, send it to our production team — we will come back with questions only where something is genuinely unclear, followed by a line-by-line quote. If you would rather start from a blank, tell us the style, fabric weight, colour, print method and quantity, and we will build the document with you.
